Your Cart is Empty
- Smartphone Gear
- Video Gear
- Photo Gear
- AIRBOX
- Light Bulbs
- Product Photography
- Ceiling & Wall Mounts
- GIFTS
| ALZO Wall Mount Background Support Installation Manual PDF |
The ALZO Wall Mount Background Support System consists of parts as shown here:
The installation of this system requires a minimum of 2 individuals and a licensed construction professional is recommended. IMPORTANT NOTICE: Proper Friction Adjust is required to prevent background roll-out. Over tightening the friction adjust will cause problems and will DAMAGE the chain drive. We will not be responsible for damaged chain drives resulting from improperly adjusted Friction Adjust.
|
The bracket mounting hole spacing
As the weight supported by this system is heavy, it is recommended to either BOLT into framing or fasten into a solid wall structure like a concrete block wall. When attempting to mount on drywall or wallboard, please contact a hardware vendor or licensed contractor to procure appropriate fasteners for very heavy loads. You will be installing 4 of the 3 position hook sets with 4, 5 and 6 poll background support systems. |
Step 2: Join the horizontal poles
.  |
Step 3: Assemble the Roller Ends into the poles and mount polesThere are 2 different plastic ends that fit into the poles and then fit into the bracket hooks. Shown here is the chain drive end. The other end is the Friction Adjust end. 
|
|
Insert the white plastic expansion clamp into the pole end as shown here and tighten the clamp by turning the knob clockwise while holding the chain guard.
|
| Do not over tighten this knob as position adjustment will be performed later. Now with assistance from another person, lift the assembled pole and mount onto the brackets by positioning plastic slots on the roller ends into the hooks in the right and left brackets. The roller ends each have 2 different plastic slots at different angles. You will mount the roller ends to position the chain guard as shown. |
|
Final Assembly Drawing
|
|
Proper use of the FRICTION ADJUST IMPORTANT NOTICE: Proper Friction Adjust is required to prevent background roll-out. Over tightening the friction adjust will cause problems and will DAMAGE the chain drive. We will not be responsible for damaged chain drives resulting from improperly adjusted Friction Adjust.When background paper is installed on the pole it is important to rotate the wing nut on the friction adjust end to prevent paper roll out when lowering the paper. This is accomplished by adjusting the friction adjust while rolling out the paper to the floor. Set the friction adjust so that the when the paper is near the floor the roller is stationary. Tightening the wing screw on the friction control will add resistance to the rotation of the roll. After the paper is on the pole, the pole is lifted into position and inserted in the hooks on the brackets. This operation requires 2 persons, and is nearly impossible for an individual to accomplish. The pole will now be tightened on the plastic ends by holding the pole with one hand, and then tighten the 2 knobs on each end until the ends are locked onto the pole. |
Step 4: Adjust friction
|
Step 5: Install wedges
|
Step 6: Install chain
|
Step 7: Install chain weights
|
|
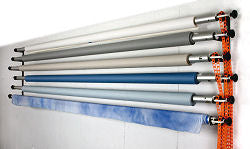
Installing fabric backgrounds requires using 2 inch wide gaffers tape on the ends of the fabric securing the fabric to the poll. Finished 6 position ALZO Wall Mount Background Support stocked with paper and Muslin backdrops
|
| For customer support for this or any other ALZO product call 203-744-7909 M-F 9:00 - 5:00 or email csupport@alzodigital.com. |
 The pole junction needs to be re- positioned to join the poles. The junction is located in the end of one of the 2 poles. Insert the L-HEX KEY (Allen wrench) into the hole where the junction is located and loosen the set screw to reposition the junction so that 50% of the junction is exposed and the pole hole aligns with the set screw. Now with the L-KEY remaining in the junction set screw to prevent movement of the junction, join the 2 poles together. Align the holes in the pole junction and the poles and use the L-KEY to tighten the 2 set screws as shown below. Tighten the set screws in alternating small tightening steps (1-2, 1-2, 1-2, ...) until both set screws are very tight.


 Proper Friction Adjust is required to prevent background roll-out.
  Insert a plastic wedge into the space between the paper center tube and the pole on both ends of the roll. Push in wedge until firm. These wedges are required to lock the paper to the pole and to prevent paper roll out.
 Insert the plastic chain through the sprocket end and adjust the length of the chain, as desired, by removing and adding links. Chain links are separated by holding 2 links in a V form and sliding them sideways.
 Add the chain weights as shown to the hanging end of the chain. Chain links are separated by holding 2 links in a V form and sliding them sideways.